Tools help us carry out particular tasks and functions. Hammers drive in nails. Saws cut wood. In the digital realm, we also use tools. Faders control volume, buttons trigger sounds. However, in software, things are not always so clear cut. Faders don’t have to control volume, and buttons don’t have to trigger sounds. The examples of faders and buttons acknowledge the two types of fundamental control: continuous (faders) and discrete (button). Our digital tools are built upon these two paradigms of continuous and discrete control.
In Kyma, the Virtual Control Surface (VCS) lets us control sounds in real time. The VCS is a tool that displays virtual faders and buttons (controlled by using a computer mouse or app). Since I don’t own an iPad, I am unable to take advantage of the VCS Kyma Control iPad app. I desired a non-mouse control inside Kyma that would let me get away from mousing and clicking. Thus, I wanted to take advantage of the controller most available to me and other users. The discrete control of the Qwerty keyboard.
This blog post covers my foray into Kyma Tools (a largely untapped resource of Kyma) and the result: an open source qwerty keyboard controller built in and for Kyma. One is process and the other is product.
Why Kyma Tool?
But let’s start off with the why. I could have easily created a Max patch that accepts ‘key’ control and then port off my ASCII values as Open Sound Control (OSC) messages to Kyma. Actually, I did. See Figure 1.
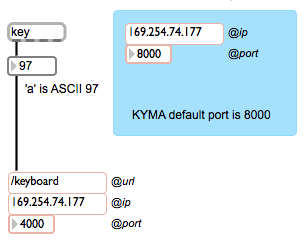
Yet, this is not as simple as it sounds. Not only do I have to open Max/MSP in order to run this patch, but I have to get the IP address of the Paca(rana), copy the IP address here… each and every time I start the Paca(rana). Not very fast for performance setup.
I wanted to see if I could embed this type of discrete, keyboard control inside of Kyma itself, cutting out third party software and reducing setup time. Hence, my foray into the Kyma Tool (aka. state machine that can read and write EventValues)
Kyma Tool Process
The Kyma Tool is where one can write a patch to carry out multi-step processes (Spectral Analysis Tool), process batch files or a folder of files, create a controller (my keypad tool), or create a virtual interactive environment (think CataRT if you wrote this in Kyma). The Kyma Tool does use SmallTalk and offers a bit different coding experience, but the Tool environment is a pretty powerful editor. I knew that if I wanted to get access to the qwerty keyboard and create a controller, I would need to dive into the Kyma Tool. (For further reference to the Kyma Tool, please see the Kyma X Manual, pp. 309-333).
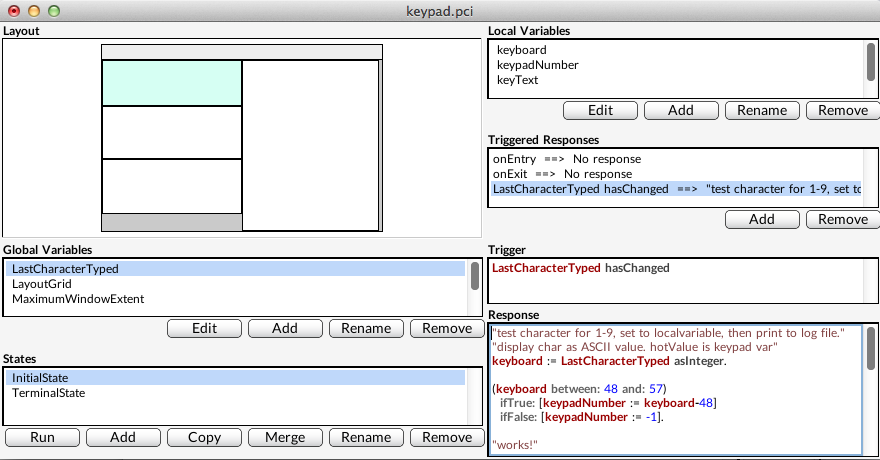
Like javascript or php, there are global and local variables, and like Flash, there are event based actions, or rather “triggers” and “responses”. A huge thank you to Carla Scaletti for tipping me to the global variable LastCharacterTyped, where the initial value, $a, stores the last character value of the qwerty keyboard based upon user input. For example, typing ‘f’ becomes $f, or typing a ‘1’ becomes $1. LastCharacterTyped gets you access to the user typing on the keyboard, but only the character value of the user’s action.
The first step of my Keypad Tool is to convert each character into ASCII. Since each value is a character, I convert the character into an ASCII integer using the Capytalk “asInteger”.
keyboard := LastCharacterTyped asInteger.
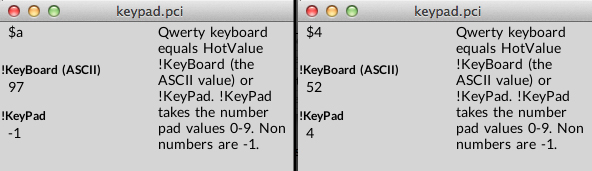
The Capytalk above stores the ASCII integer into the local variable keyboard. The local variable ‘keyboard’ writes/outputs its value to the HotValue !KeyBoard. Writing the control to a HotValue provides access. !KeyBoard, the ASCII integer of a user’s keyboard, is now accessible, in real time, by any Kyma Sound that references the variable !KeyBoard. So long as one uses the Keypad Tool, !KeyBoard can be used by any Kyma Sound at any time, anywhere, just like the Max patch above.

The next function I desired, beyond accessing the Qwerty keyboard values as a Kyma HotValue, was to specifically address the number pad 0-9 (in ASCII, 0-9 equal 48-57). For these ten keys, I wanted 0-9 keypad values to store as their actual numbers inside a different HotValue. Below is the Kyma Tool code.
(keyboard between: 48 and: 57)
ifTrue: [keypadNumber := keyboard-48]
ifFalse: [keypadNumber := -1].
Here’s the English version. If the ‘keyboard’ variable (this is our ASCII value) is between 48 and 57 (inclusive so would react to 0-9 on the keyboard), then store your value into variable ‘keypadNumber’. If not, store a -1. In Kyma, we usually write Capytalk true: () false: (). In Kyma Tool land, I had to learn that we need ifTrue: [] ifFalse: []. Subtle syntax, but one that I lost an hour over. You’ll see in the example files how we’ll utilize the Capytalk true: () false: () in a SoundToGlobalController.
The ‘keypadNumber’ variable also outputs its value to a HotValue, !KeyPad. !KeyPad outputs 0-9 when qwerty keys 0-9 are pressed. Otherwise, any other key value outputs -1.
Kyma Tool in Action
Ok. So how does one use this Kyma Tool? Similar to the Tools > Fake Keyboard or Tools > Spectral Analysis tool inside Kyma, all one needs to do is open the Tool (‘keypad.pci’) inside Kyma (File > Open) and start typing on the keyboard to output values. No external software or OSC setup necessary. Of course, however, you’ll need to download the tool.
The only note about Kyma Tools is that their window needs to be highlighted (in front) in order to work properly. This is not a new software concept, but one that users of Kyma Tools should be aware of.
Download
Download the keypad.pci Kyma Tool and example files to help you get started.
We absolutely love your blog and find almost all of your post’s to be just what I’m looking for. Do you offer guest writers to write content to suit your needs? I wouldn’t mind composing a post or elaborating on many of the subjects you write in relation to here.
Again, awesome site!