Much of the album sound design was made using Symbolic Sound Kyma.
Purchase Monster Rotations on Bandcamp.
Stream on Spotify.
Much of the album sound design was made using Symbolic Sound Kyma.
Purchase Monster Rotations on Bandcamp.
Stream on Spotify.
While teaching Data Sonification at the University of Oregon, we talked a lot about inference preservation, communication of idea, filtering and bias of data, and by extension, tool building as a process for supporting sonic hypotheses. To that end, I wanted to empower students with their own work inside Kyma, so we spent a class walking through the process of Encapsulation.
Encapsulation allows one to take a Sound and “create a simpler, cleaner interface for that Sound by reducing the number of controls and putting them all on the same level. Encapsulating a Sound does not make it more computationally efficient, but it does present a clearer control interface between you and the Sound” (Kyma X Revealed 2004: 293). Or, another computer music way to say it…
Max/MSP::abstraction
Kyma::encapsulation
For those familiar with NeverEngine Labs, one can understand the power of encapsulation to create some really great Sounds that serve compositional, sonic, aesthetic, and educational goals. Encapsulated Sounds can help one save time, grow as a practitioner, and engage with the growing Kyma community. Tool building and sharing also invites positive activities like research, collaboration, and publication. The Kyma X Revealed section on Encapsulation (pp. 293-303) is a great starter, but can be a difficult first reference for the uninitiated. This article seeks to provide a current walkthrough of encapsulation that supplements existing documentation.
What will you need? Head over to the Kyma Community Library (https://kyma.symbolicsound.com/library/encapsulation-walkthrough/) to grab walkthrough files, but beyond this article, you will find Kyma X Revealed (293-303), any software to create a .png icon (e.g. Adobe Illustrator, Photoshop), and your design thinking hat helpful.
The process to Encapsulation follows five basic steps.
1. Create a Sound(s) to encapsulate
2. Define your controls and change the values (numbers or !EventVariables) to ?vars
3. Create a new class (Action > “New class from example”)
4. Add default values to the controls to open up Class Editor
5. Add descriptions and icon, set parameter types, and close to Save Class.
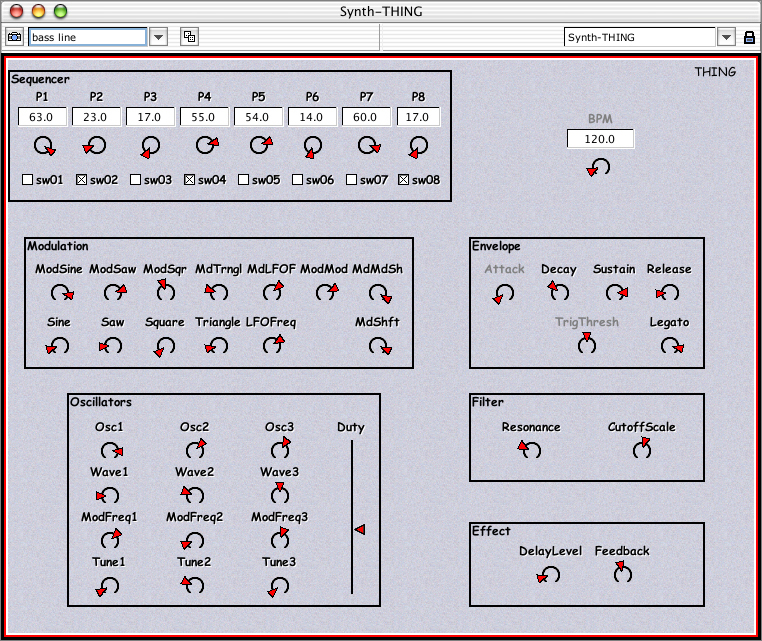
Step 1. I created a simple Sound to encapsulate (Figure 1).
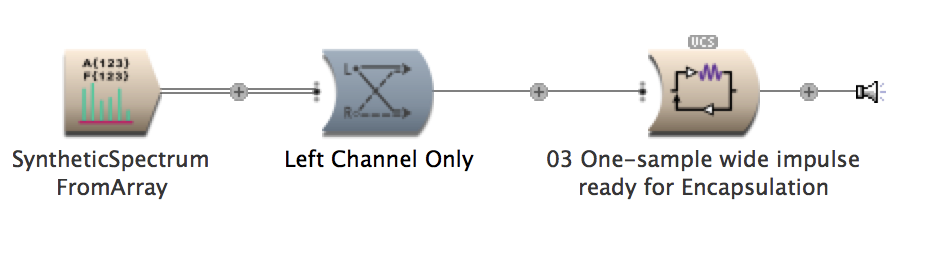
The Kyma Sound to encapsulate, a one-sample wide impulse of N-samples long, is meant for controlling the amplitude of a single band in a spectral analysis of the same sample length (e.g. 256 samples). Bearing this user case in mind, where the encapsulated Sound will effect a spectral analysis’ amplitudes, Figures 2 and 3 depict the parameters fields of the two Sounds that create the effect (SyntheticSpectrumFromArray and DelayWithFeedback, respectively).


Step 2. I labelled the most helpful controls for the encapsulation process as green ?variables (Figure 2 and 3). Green ?variables are what enable a user to access parameter fields after encapsulation. The three user parameters, ?ImpulseAmplitude, ?samples, and ?Delay provide the user with the ability to control the amplitude of any single partial in a spectral analysis of n-window size. SyntheticSpectrumFromArray (Figure 2) creates a n-sample long spectrum with only one envelope. Since Kyma handles spectrums in the time domain as Amplitudes in the Left channel and Frequencies in the Right Channel, we treat the Partials parameter field more like the Sample length of the analysis. A single envelope is generated with the Envelope parameter field set to 1, there will only be one partial to control, with all other envelope amplitudes set to 0. That single envelope’s gain is controlled by ?ImpulseAmplitude. The Left Channel is selected, which means the SyntheticSpectrum Sound will only impact the spectrum partial’s amplitude, not its frequency. [See Gustav Scholda’s in-depth video for how spectral analysis works in Kyma and how to spectrally manipulate frequency and amplitude.]
?samples is meant to match the length of the spectral analysis it will later control. The delay length is also set to the same length, as DelayWithFeedback enables the single envelope to “scrub” across the sample length. In essence, ?Delay enables a user to select which partial’s amplitude they will effect.
Footnote: An esoteric note about this particular Sound. The Amplitudes parameter field of SyntheticSpectrumFromArray expects an array. Because the variable ?ImpulseAmplitude is a green ?variable, Kyma will prompt and ask the user if the ?variable is an “Element” or an “Array.” Because the Sound is meant to control a single partial, the ?variable is an “Element,” not an “Array.”
Step 3. Time for Encapsulation. From the main menu, select Action > New class from example (Figure 4).

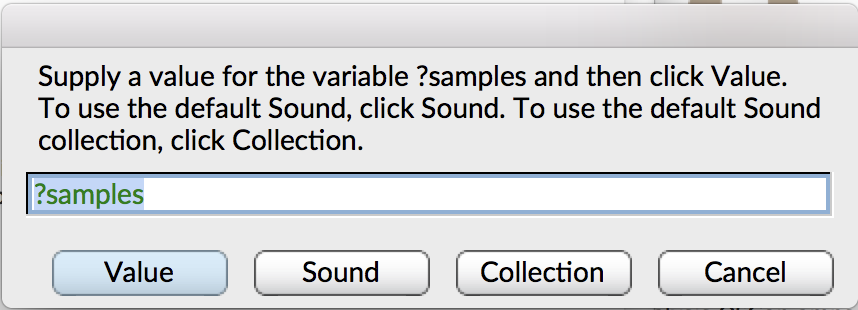
Step 4. The menu selection will then generate a user prompt to add default values to the three green ?variables (Figure 5). All variables are “Values” and whatever is entered will generate defaults values one may alter later. For now, one may enter 1 for ?ImpulseAmplitude, 256 for ?samples, and 0 for ?Delay.
Step 5. The real encapsulation work begins adding Class name, descriptions, icon, and Input/Output type for formatting look and feel. Figures 6 and 7 depict the encapsulation editing process before and after.
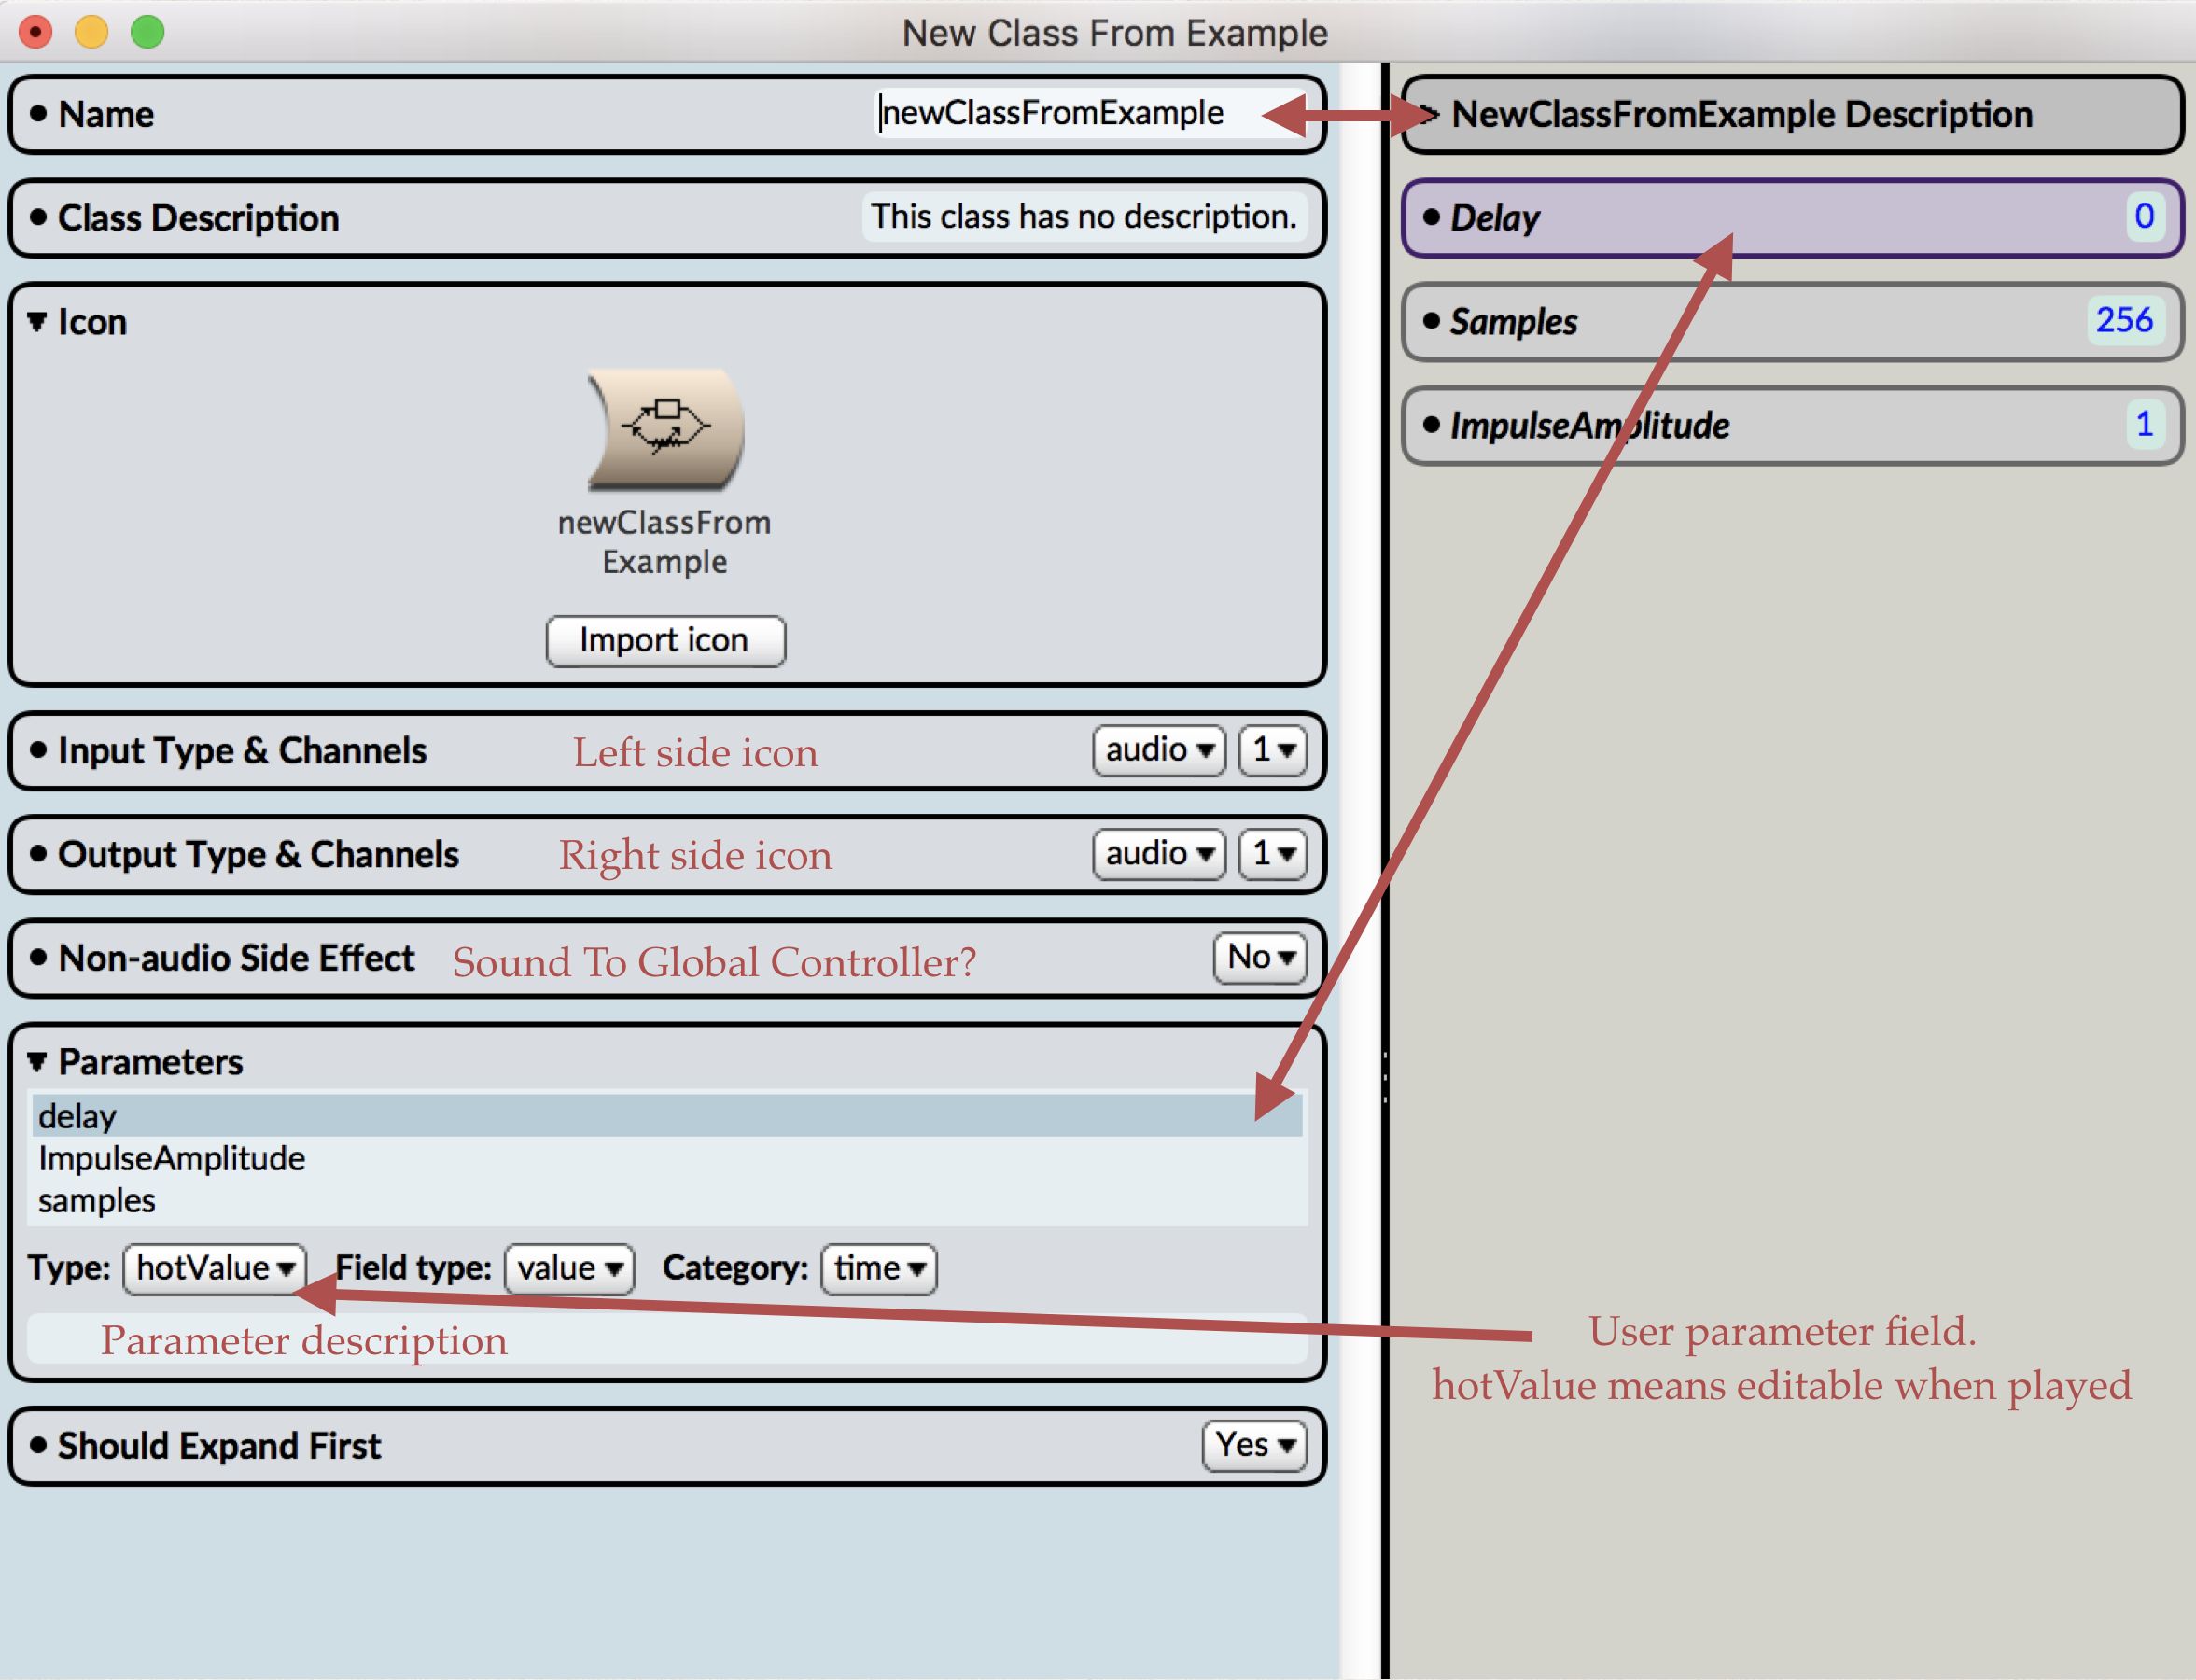
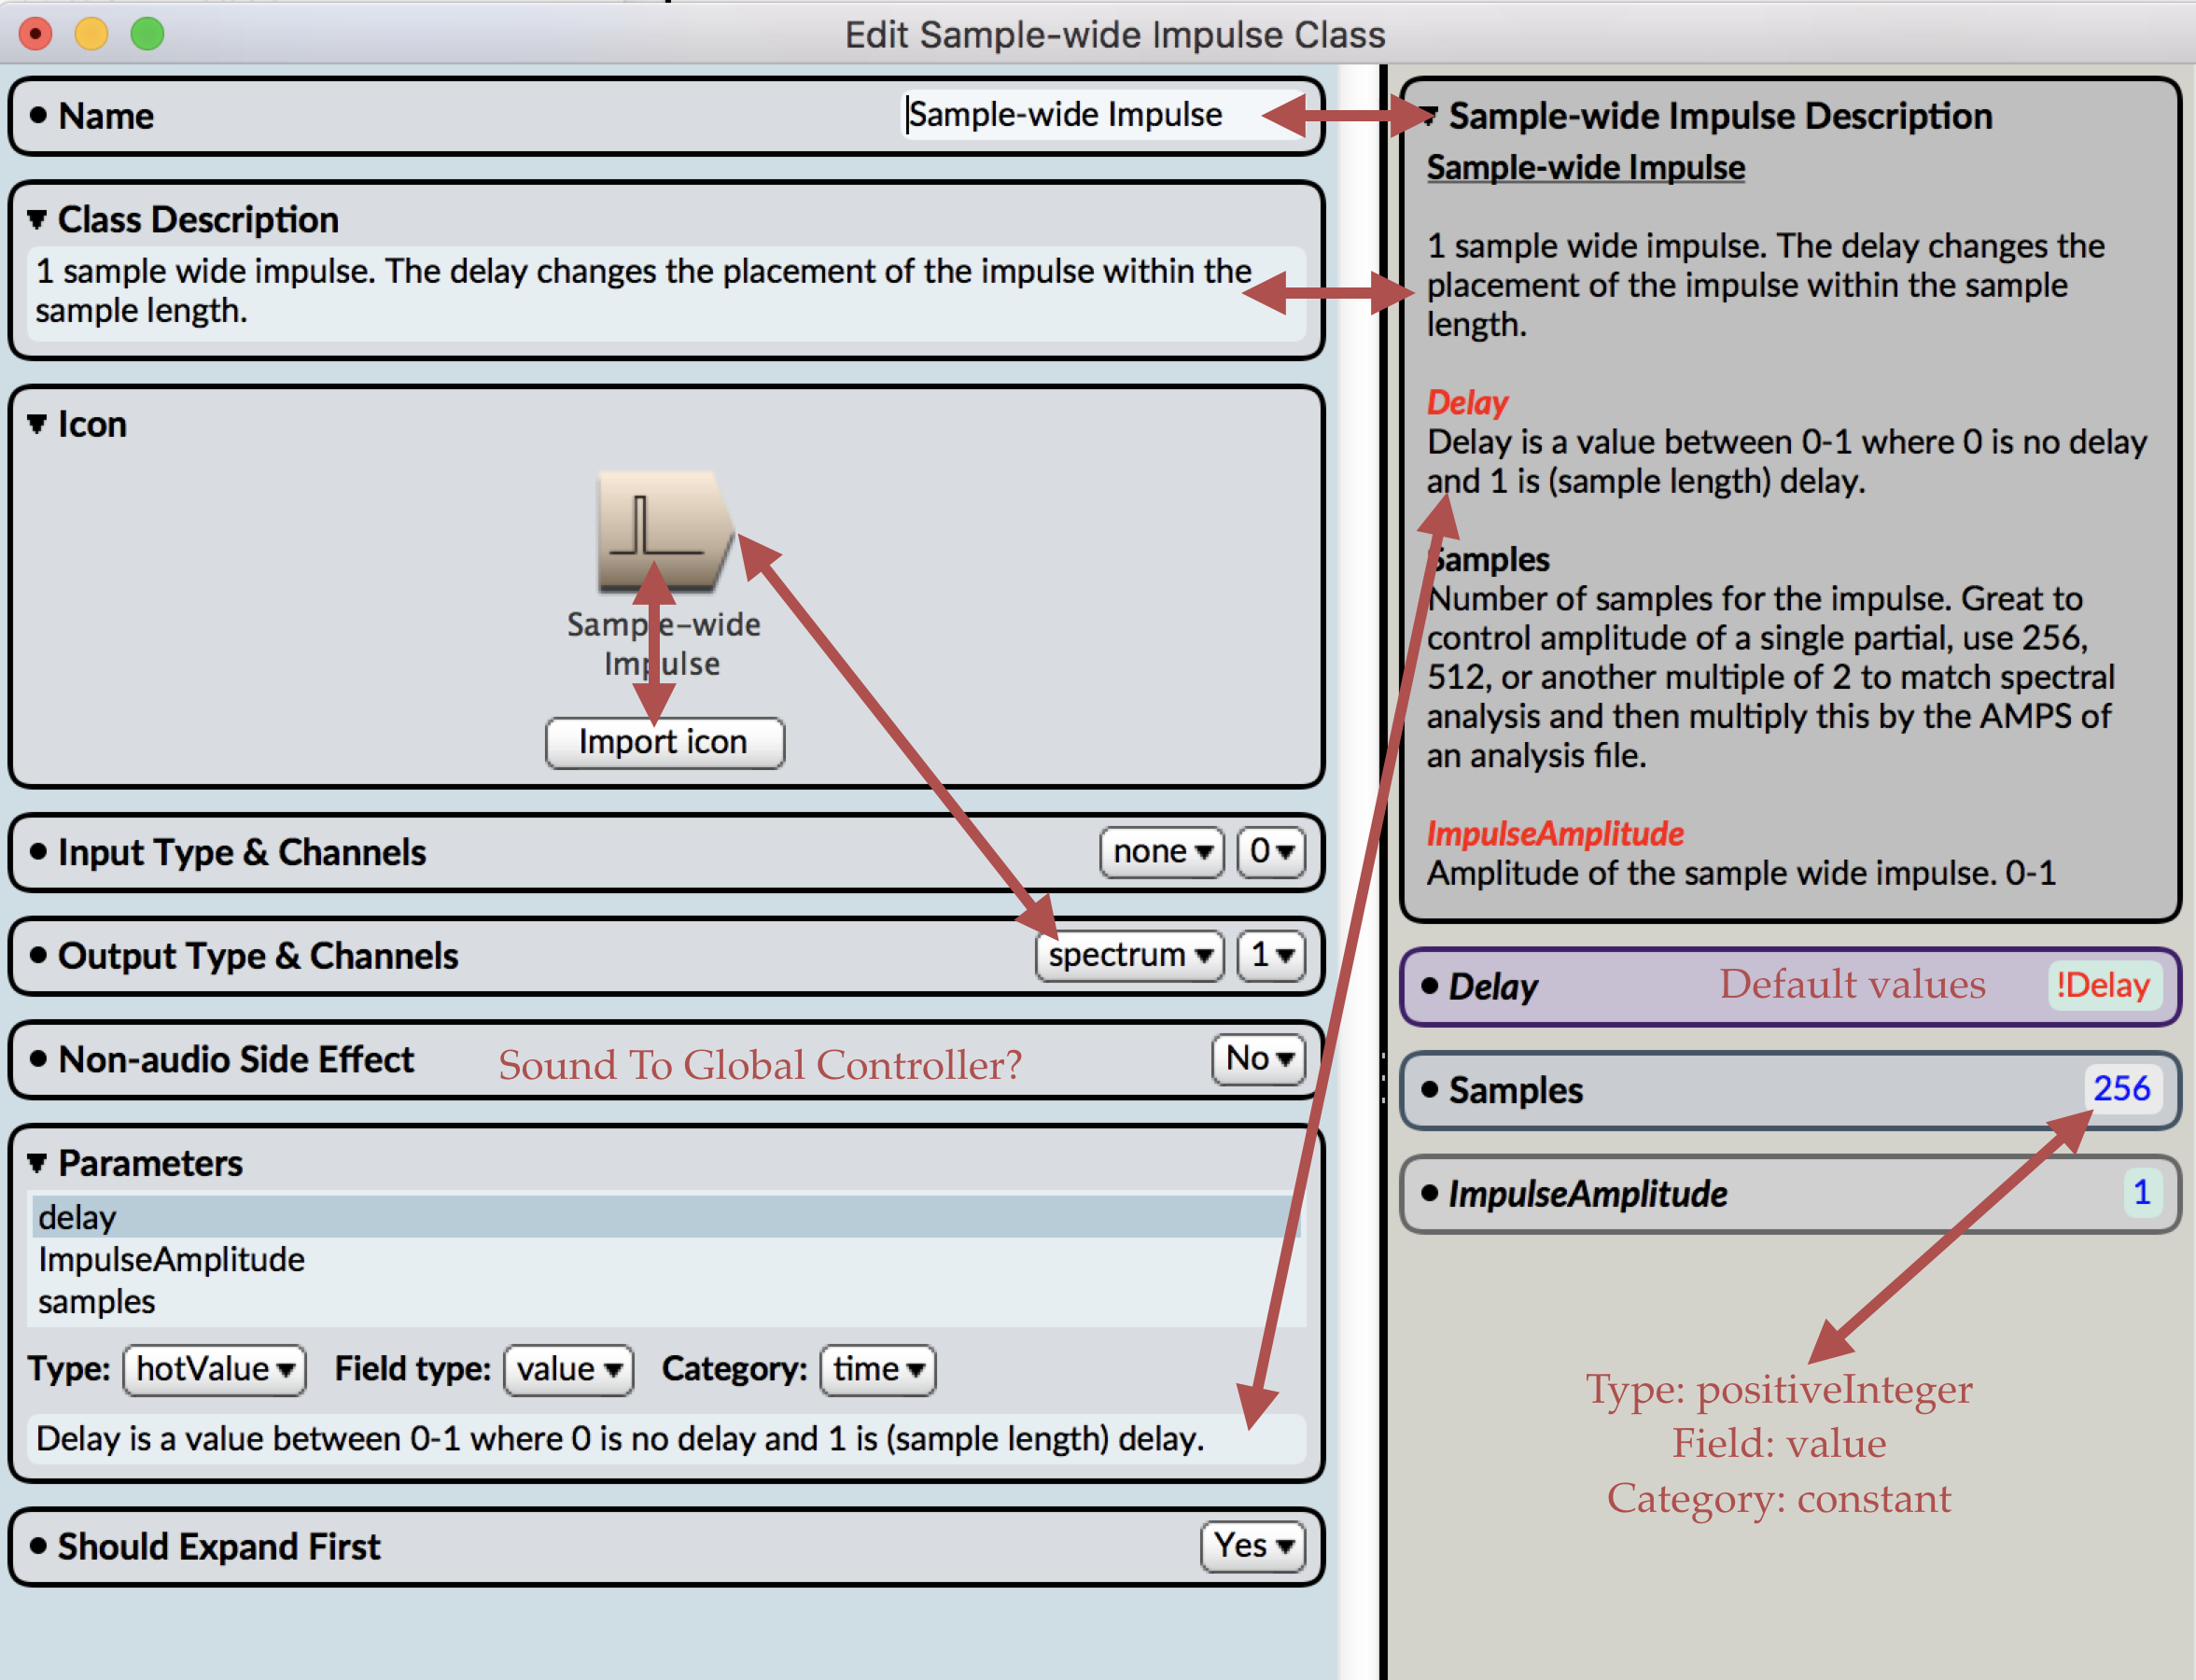
The various fields altered for the encapsulation are as follow. Name is the name of the class, which can be searched for. Class description is the overall description, which can include overall sonic description, use cases, and user specific comments.
Parameters are designated before creating a new class. Each ?var ends up as a parameter field. For example, ?samples becomes the parameter field “Samples.” Naming a ?var sets the Class parameter field name. The parameter field in the Class editor contains our default value from the previous step, but can be changed in the editor. In addition, the Parameter options in the left tab will enable one to set Type, Field Type, and Category of the Parameter altering how the parameter field behaves and looks. Figure 7 depicts two of three parameter fields and these options.
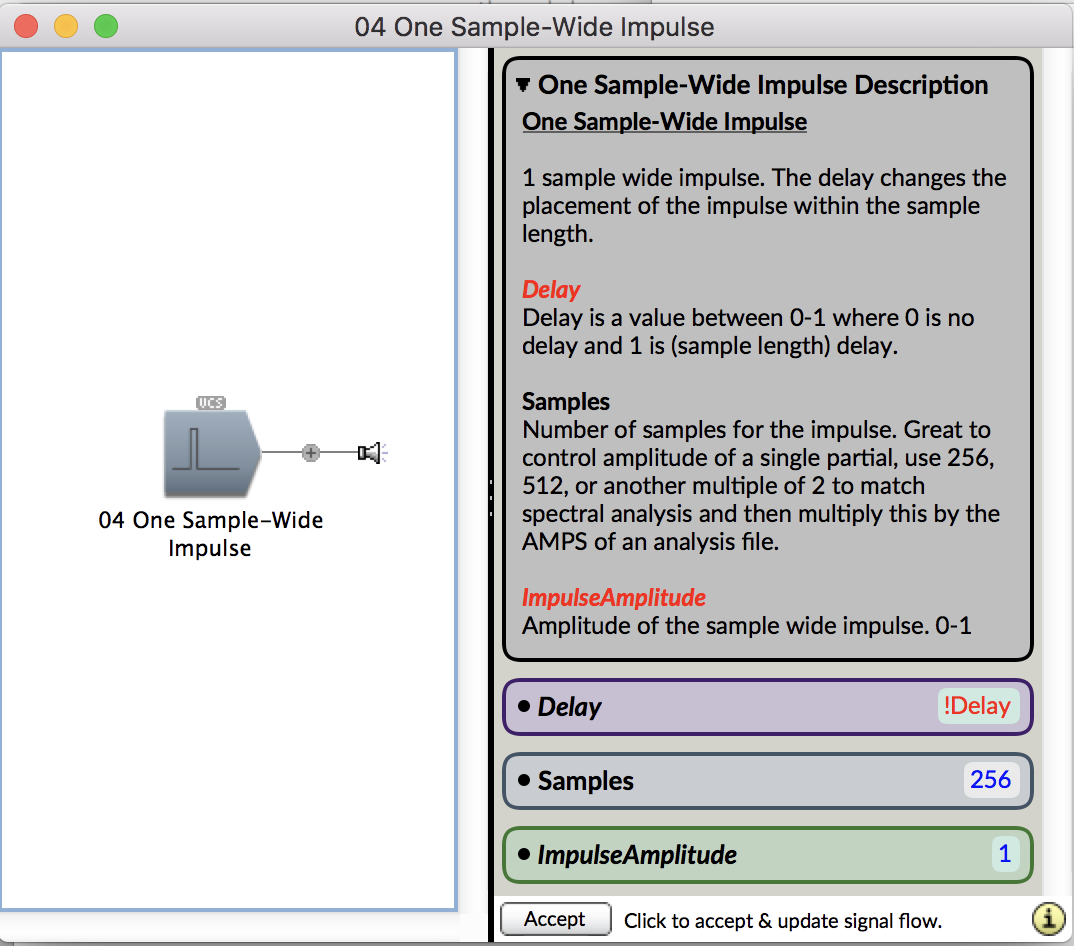
Close the Editor window to save the class. You may always edit the class by choosing the “Edit class” option from the Action menu (Action > Edit class). Figure 8 shows the completed encapsulated sound.
Example
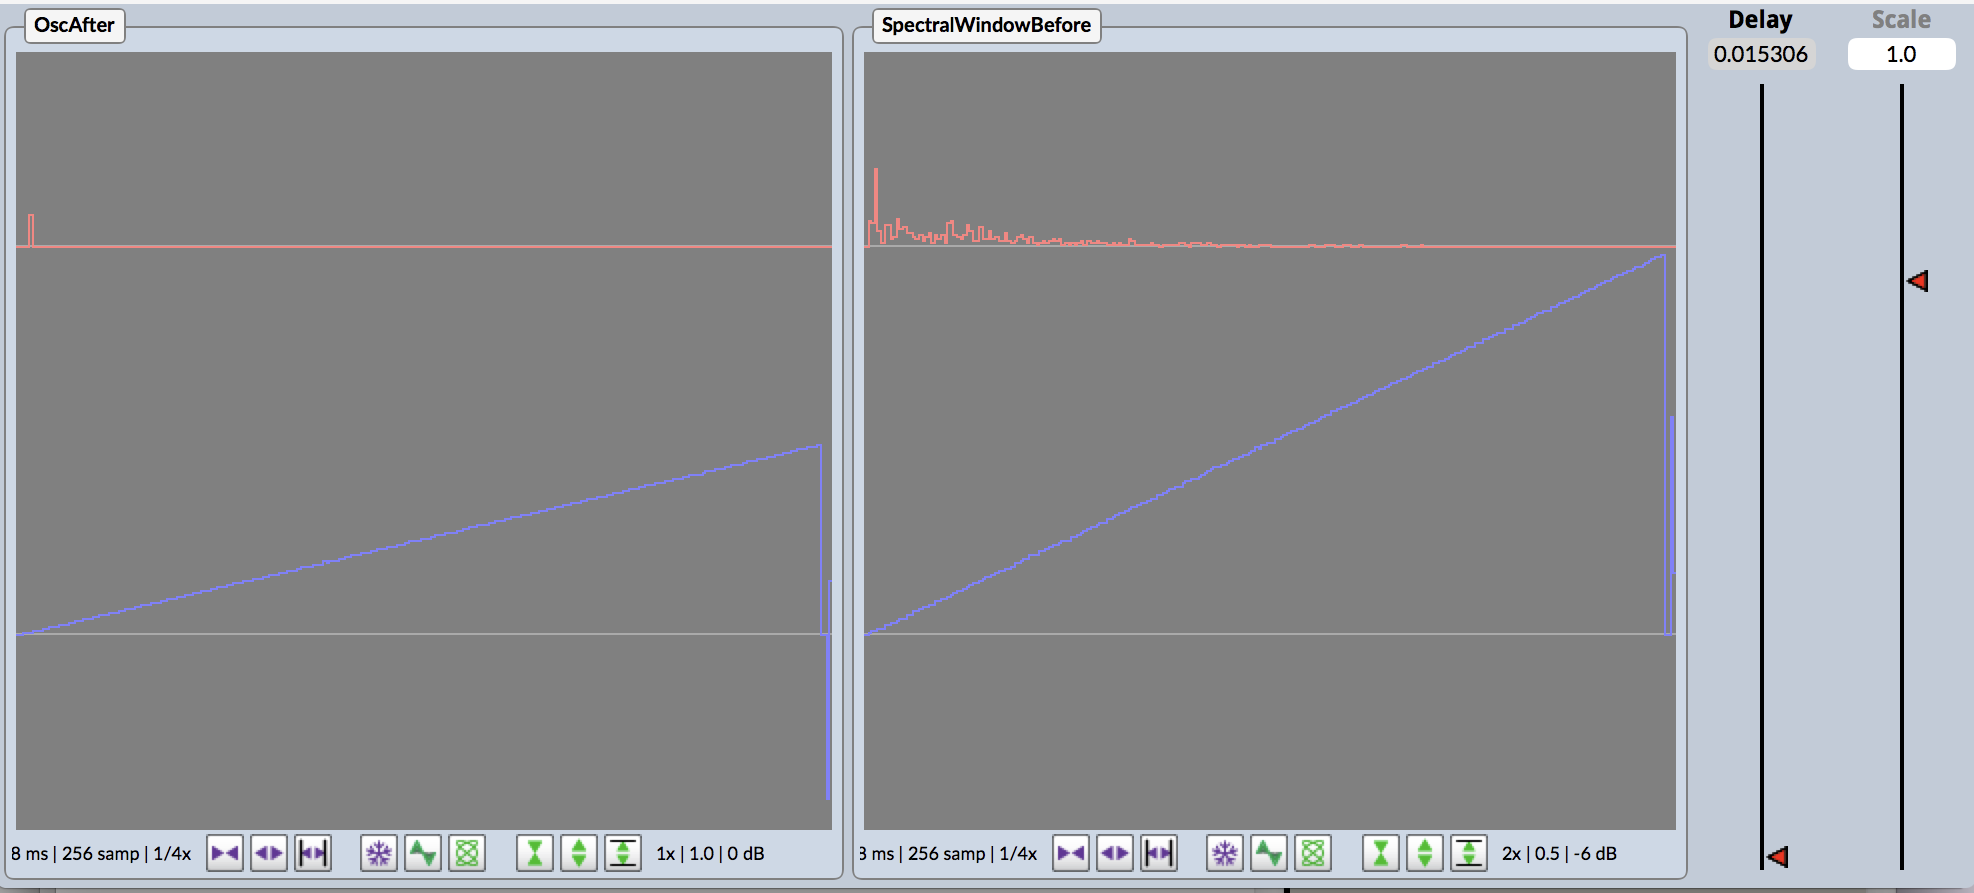
Figure 9 depicts our new One Sample-Wide Impulse Class played through a 256 sample-wide oscilloscope. Since the delay is set to 0.5, we see our single sample residing in the middle of the oscilloscope (128th sample). Because the single sample may be moved in time (Delay parameter) and has control of gain (ImpulseAmplitude parameter), the Class may be used as a partial picker in Spectral Analysis.
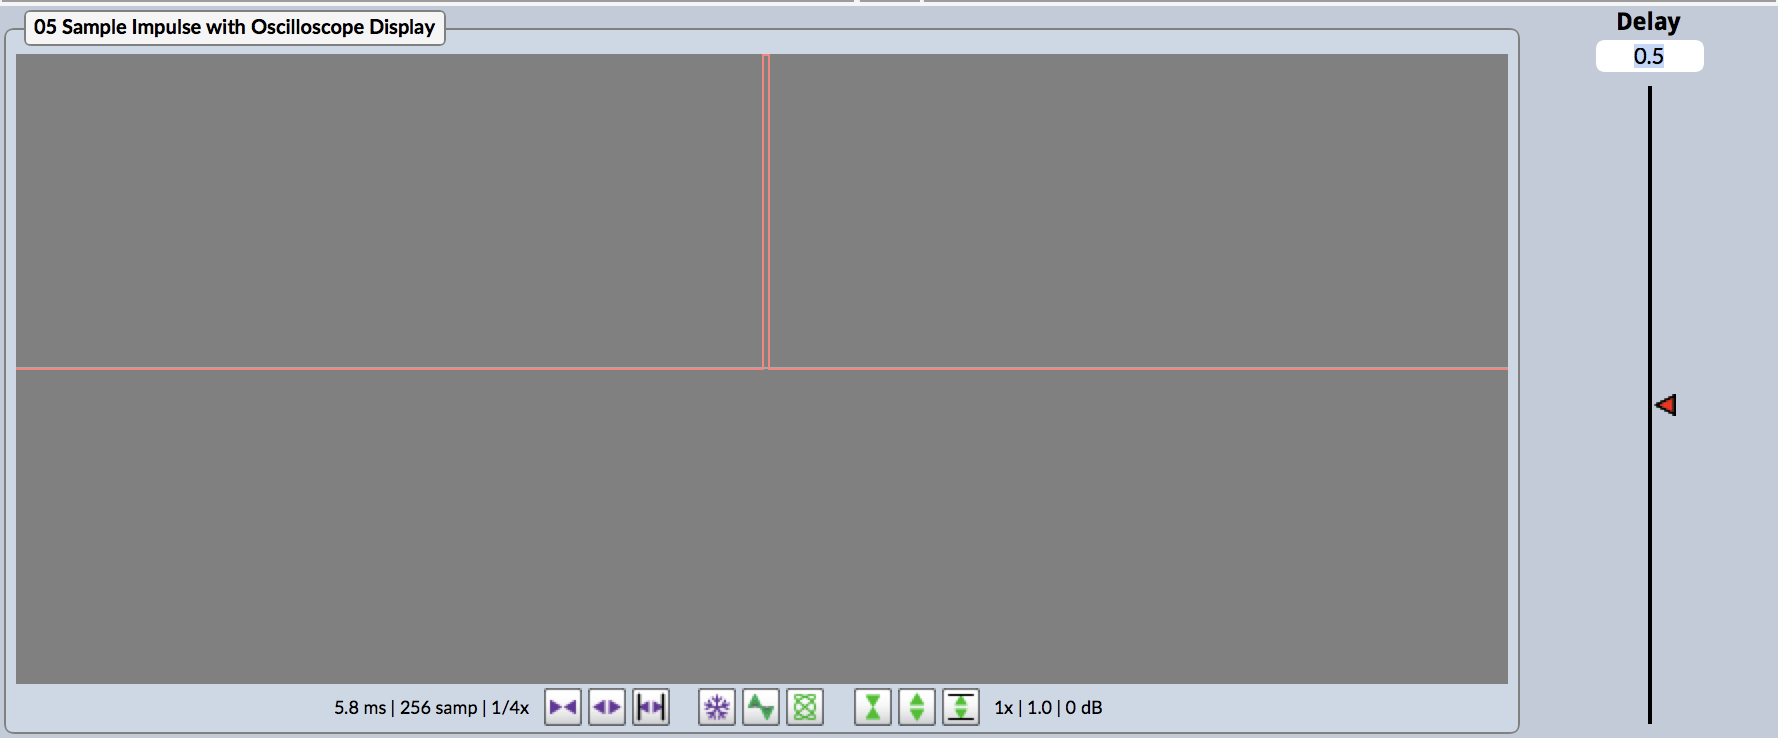
Figure 10 depicts spectral analysis in Kyma, where amplitude and frequencies are divided between left and right channels. The first partial is displayed as the first sample, second partial as second sample, etc. Understanding this concept, we may use One Sample-Wide Impulse to control (read multiply) amplitudes of the left channel in a spectral analysis.

Figure 11 shows how an encapsulated Sound is used to multiply against amplitudes of a Spectral Analysis.
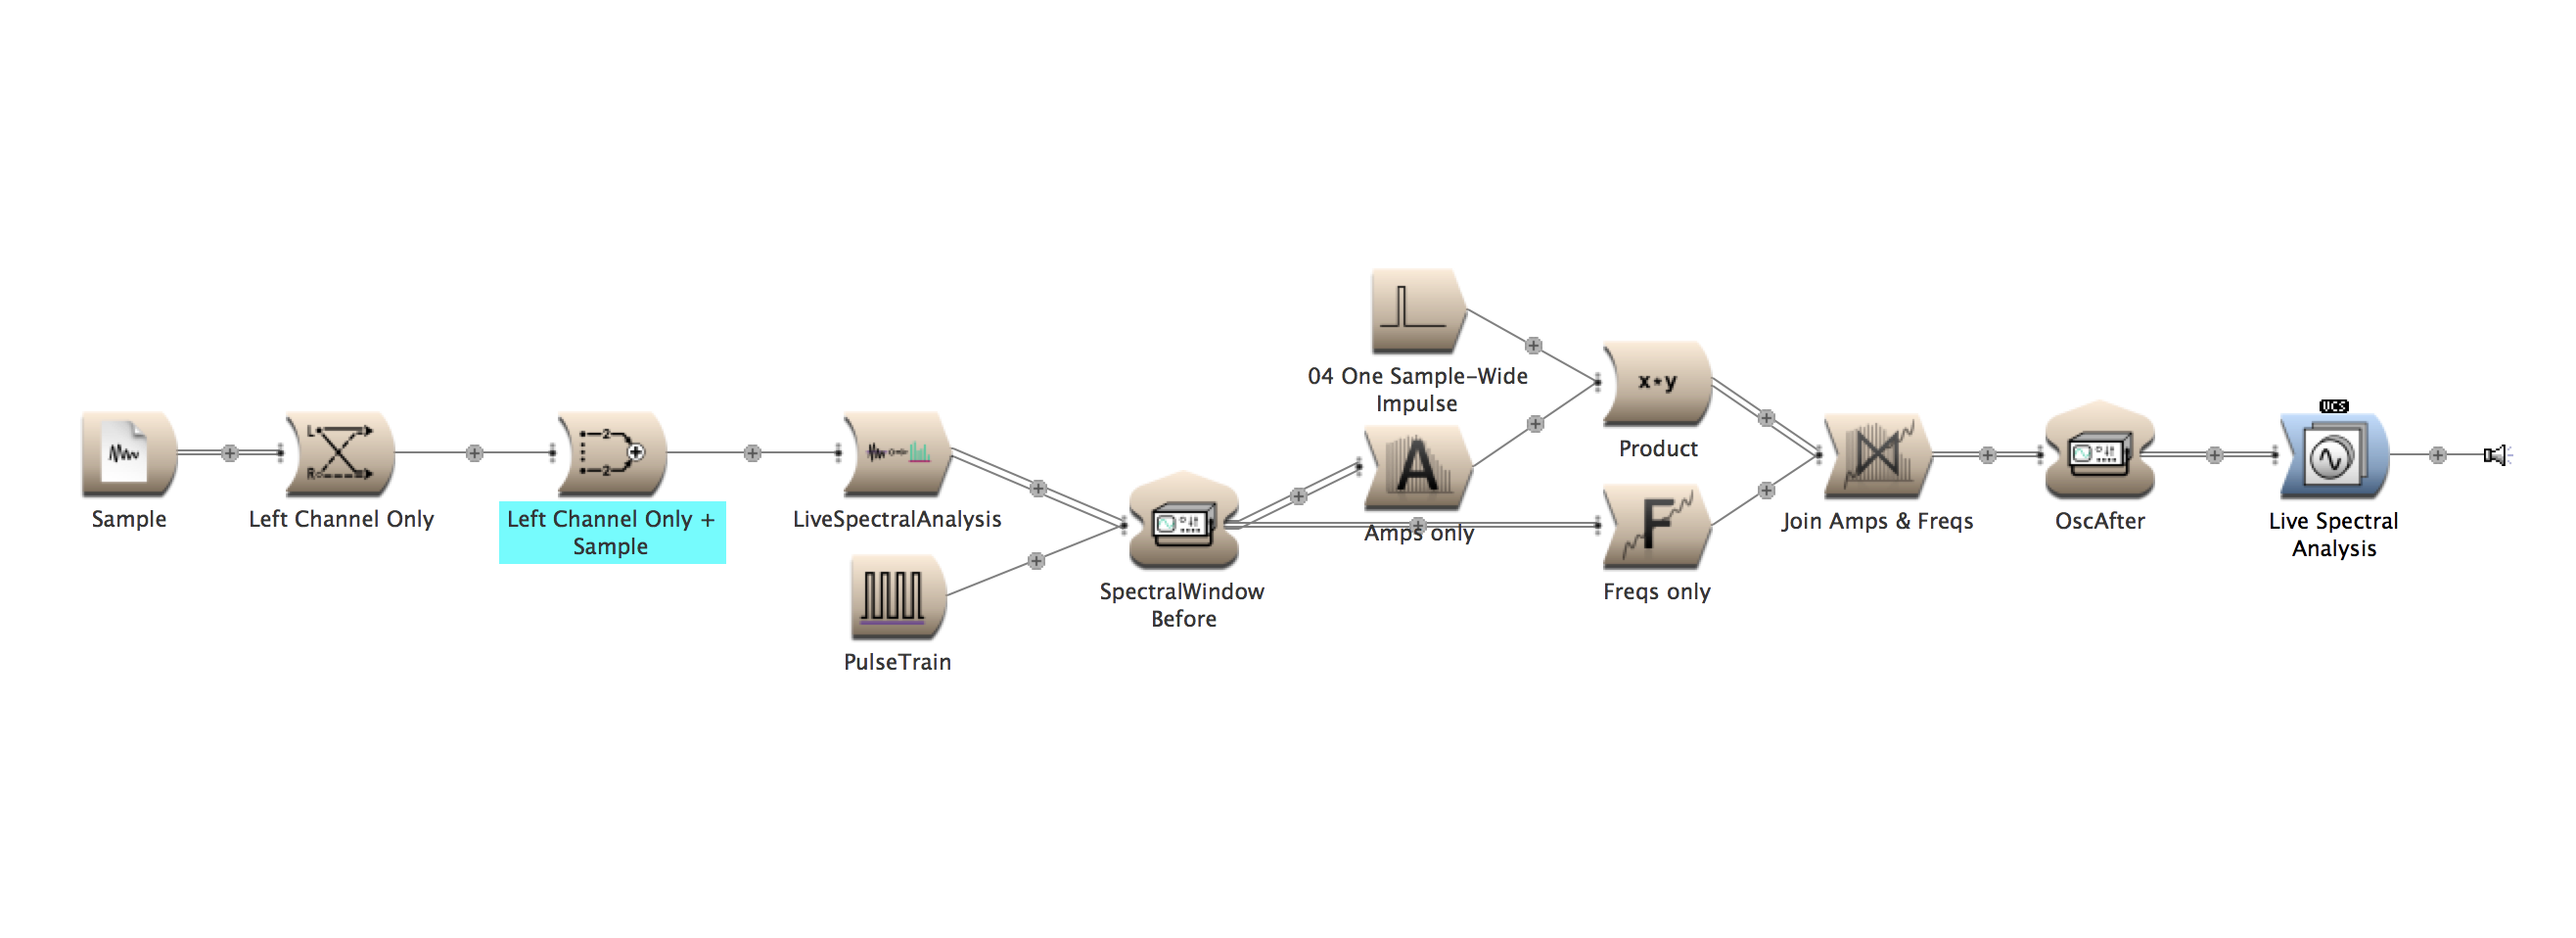
Figure 12 shows oscilloscope view of partials, with single sample wide (one partial) amplitude control. Delay is set relative (0-1) to the 256 partials in the analysis.
Two audio examples using Beck “Dreams” to depict the One Sample-Wide Impulse Class in use as a partial picker.
Audio 1. Beck “Dreams” running through live spectral analysis using a 256 sample window. No partial picking.
Audio 2. Beck “Dreams” with the One Sample-Wide Impulse class controlling playback of a single partial of the 256 sample live spectral analysis. Audio sweeps from a singular low partial to high partial selection and then back down again.
Overwhelmed by pain, shock, or grief, these three actions demonstrate how we may lose control of our physical bodies, revealing just how fragile we are.
Video documents performance at the International Computer Music Conference (ICMC) in Denton, TX on Sept. 29, 2015. All sounds are triggered and controlled using the Gametrak gaming device and Wacom Tablet.
Tools help us carry out particular tasks and functions. Hammers drive in nails. Saws cut wood. In the digital realm, we also use tools. Faders control volume, buttons trigger sounds. However, in software, things are not always so clear cut. Faders don’t have to control volume, and buttons don’t have to trigger sounds. The examples of faders and buttons acknowledge the two types of fundamental control: continuous (faders) and discrete (button). Our digital tools are built upon these two paradigms of continuous and discrete control.
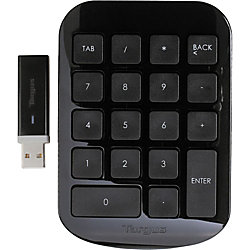
In Kyma, the Virtual Control Surface (VCS) lets us control sounds in real time. The VCS is a tool that displays virtual faders and buttons (controlled by using a computer mouse or app). Since I don’t own an iPad, I am unable to take advantage of the VCS Kyma Control iPad app. I desired a non-mouse control inside Kyma that would let me get away from mousing and clicking. Thus, I wanted to take advantage of the controller most available to me and other users. The discrete control of the Qwerty keyboard.
This blog post covers my foray into Kyma Tools (a largely untapped resource of Kyma) and the result: an open source qwerty keyboard controller built in and for Kyma. One is process and the other is product.
Why Kyma Tool?
But let’s start off with the why. I could have easily created a Max patch that accepts ‘key’ control and then port off my ASCII values as Open Sound Control (OSC) messages to Kyma. Actually, I did. See Figure 1.
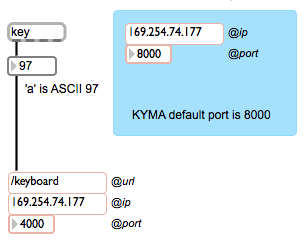
Yet, this is not as simple as it sounds. Not only do I have to open Max/MSP in order to run this patch, but I have to get the IP address of the Paca(rana), copy the IP address here… each and every time I start the Paca(rana). Not very fast for performance setup.
I wanted to see if I could embed this type of discrete, keyboard control inside of Kyma itself, cutting out third party software and reducing setup time. Hence, my foray into the Kyma Tool (aka. state machine that can read and write EventValues)
Kyma Tool Process
The Kyma Tool is where one can write a patch to carry out multi-step processes (Spectral Analysis Tool), process batch files or a folder of files, create a controller (my keypad tool), or create a virtual interactive environment (think CataRT if you wrote this in Kyma). The Kyma Tool does use SmallTalk and offers a bit different coding experience, but the Tool environment is a pretty powerful editor. I knew that if I wanted to get access to the qwerty keyboard and create a controller, I would need to dive into the Kyma Tool. (For further reference to the Kyma Tool, please see the Kyma X Manual, pp. 309-333).
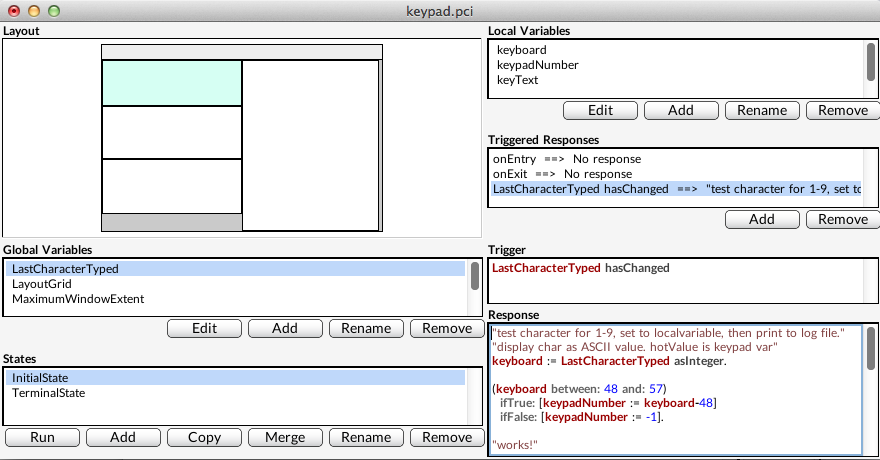
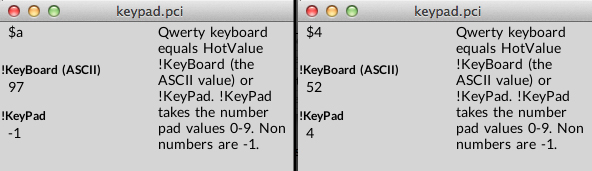
Like javascript or php, there are global and local variables, and like Flash, there are event based actions, or rather “triggers” and “responses”. A huge thank you to Carla Scaletti for tipping me to the global variable LastCharacterTyped, where the initial value, $a, stores the last character value of the qwerty keyboard based upon user input. For example, typing ‘f’ becomes $f, or typing a ‘1’ becomes $1. LastCharacterTyped gets you access to the user typing on the keyboard, but only the character value of the user’s action.
The first step of my Keypad Tool is to convert each character into ASCII. Since each value is a character, I convert the character into an ASCII integer using the Capytalk “asInteger”.
keyboard := LastCharacterTyped asInteger.
The Capytalk above stores the ASCII integer into the local variable keyboard. The local variable ‘keyboard’ writes/outputs its value to the HotValue !KeyBoard. Writing the control to a HotValue provides access. !KeyBoard, the ASCII integer of a user’s keyboard, is now accessible, in real time, by any Kyma Sound that references the variable !KeyBoard. So long as one uses the Keypad Tool, !KeyBoard can be used by any Kyma Sound at any time, anywhere, just like the Max patch above.

The next function I desired, beyond accessing the Qwerty keyboard values as a Kyma HotValue, was to specifically address the number pad 0-9 (in ASCII, 0-9 equal 48-57). For these ten keys, I wanted 0-9 keypad values to store as their actual numbers inside a different HotValue. Below is the Kyma Tool code.
(keyboard between: 48 and: 57)
ifTrue: [keypadNumber := keyboard-48]
ifFalse: [keypadNumber := -1].
Here’s the English version. If the ‘keyboard’ variable (this is our ASCII value) is between 48 and 57 (inclusive so would react to 0-9 on the keyboard), then store your value into variable ‘keypadNumber’. If not, store a -1. In Kyma, we usually write Capytalk true: () false: (). In Kyma Tool land, I had to learn that we need ifTrue: [] ifFalse: []. Subtle syntax, but one that I lost an hour over. You’ll see in the example files how we’ll utilize the Capytalk true: () false: () in a SoundToGlobalController.
The ‘keypadNumber’ variable also outputs its value to a HotValue, !KeyPad. !KeyPad outputs 0-9 when qwerty keys 0-9 are pressed. Otherwise, any other key value outputs -1.
Kyma Tool in Action
Ok. So how does one use this Kyma Tool? Similar to the Tools > Fake Keyboard or Tools > Spectral Analysis tool inside Kyma, all one needs to do is open the Tool (‘keypad.pci’) inside Kyma (File > Open) and start typing on the keyboard to output values. No external software or OSC setup necessary. Of course, however, you’ll need to download the tool.
The only note about Kyma Tools is that their window needs to be highlighted (in front) in order to work properly. This is not a new software concept, but one that users of Kyma Tools should be aware of.
Download
Download the keypad.pci Kyma Tool and example files to help you get started.
Selecting a portion of an audio sample is something that we do often. Digital Audio Workstations (DAWs) like Logic and ProTools or even Sample Track Editors like Peak and Audacity allow users to select a portion of audio.
The process of selecting audio with a mouse for out-of-real-time control (and in the comfort of one’s studio) isn’t a bad paradigm. However, what about live performance contexts? What other paradigms exist, may be altered, or can be created to benefit live performance?
In conversations with Ted Coffey one such idea came up. With the Wacom tablet, one may alter the start and end selection times of an audio sample based upon the pen’s position in XY space. This idea, sample selection times in XY space, is entirely Ted’s and I can take no credit. Still, I was and am excited about his control idea and I really wanted to listen to a sound using the XY control paradigm. This blog post documents my implementation of sample selection times in XY space based upon Ted’s description.
In order to control sample selection times we need to control three things:
a. sample selection start
b. sample selection end
c. start/stop sample
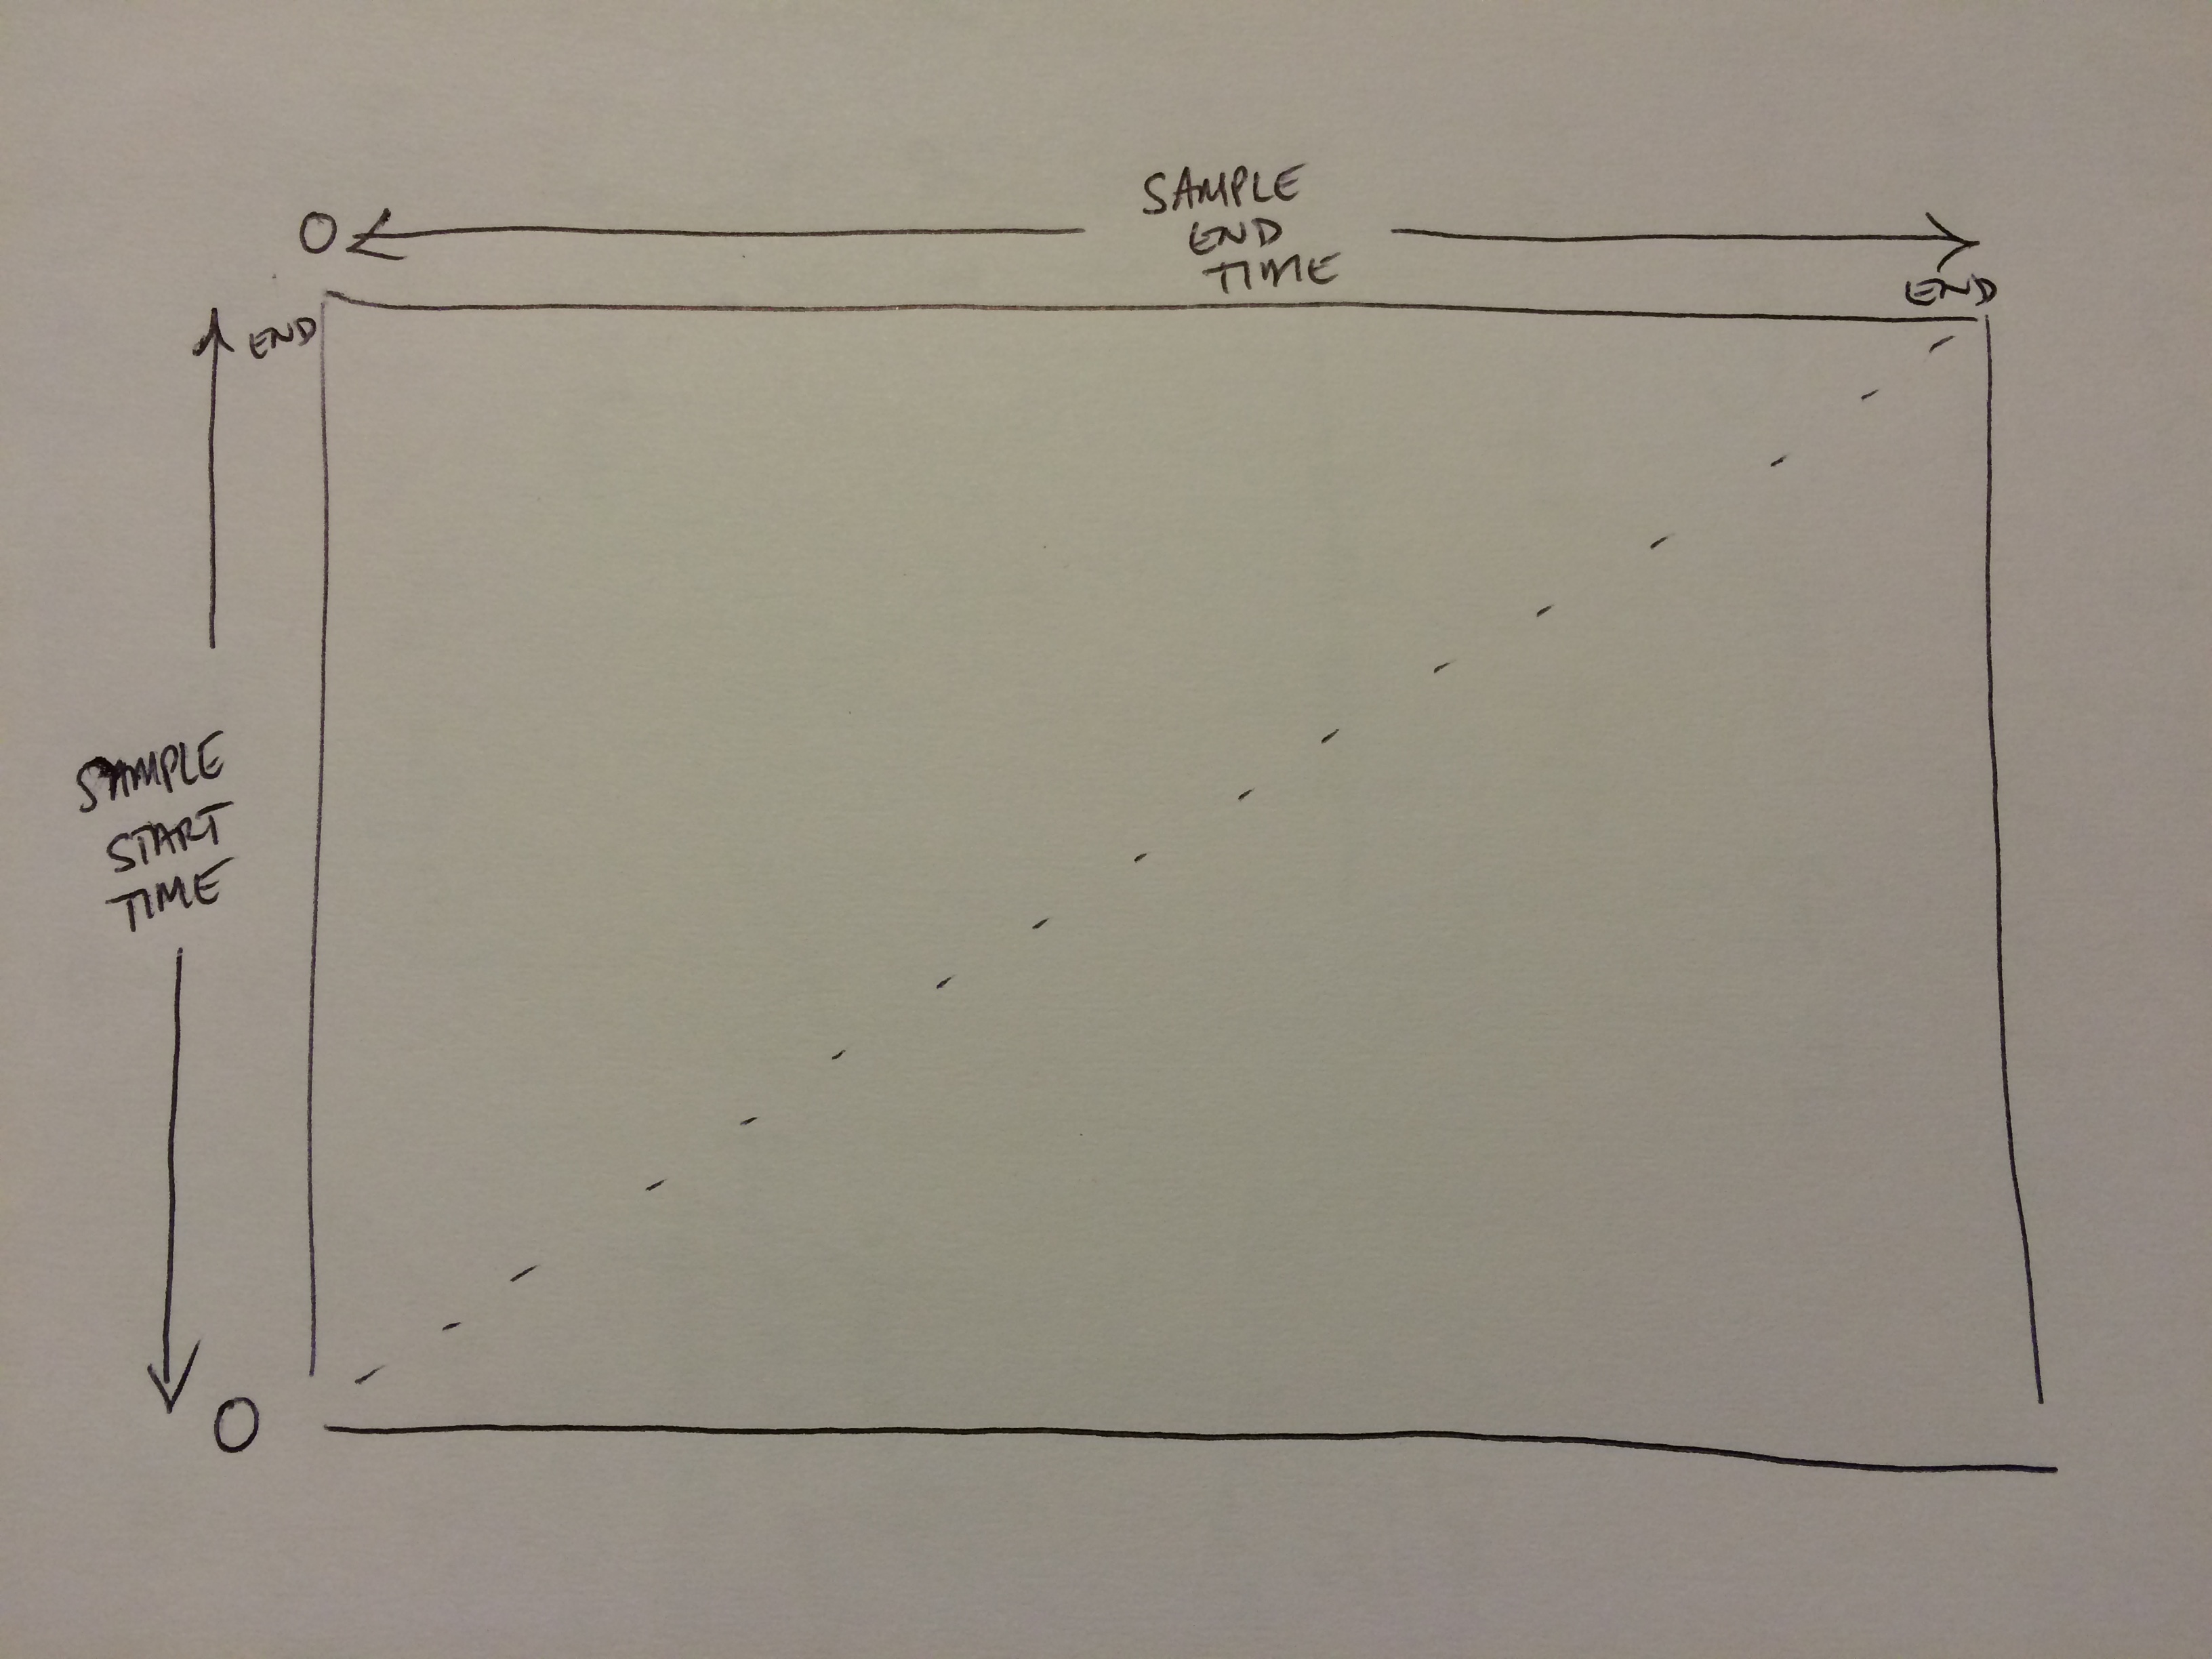
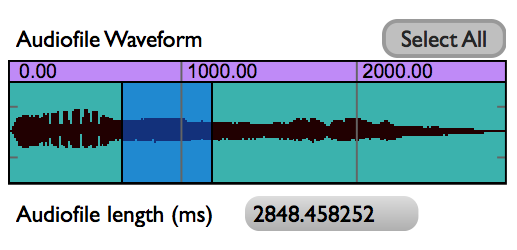
Using the Wacom tablet, we map XY space onto the sample selection start and end times (Y-axis is selection start, X-axis is selection end) and use !PenDown to trigger the sample start/release.
So, what does this sound like? Here are two examples.
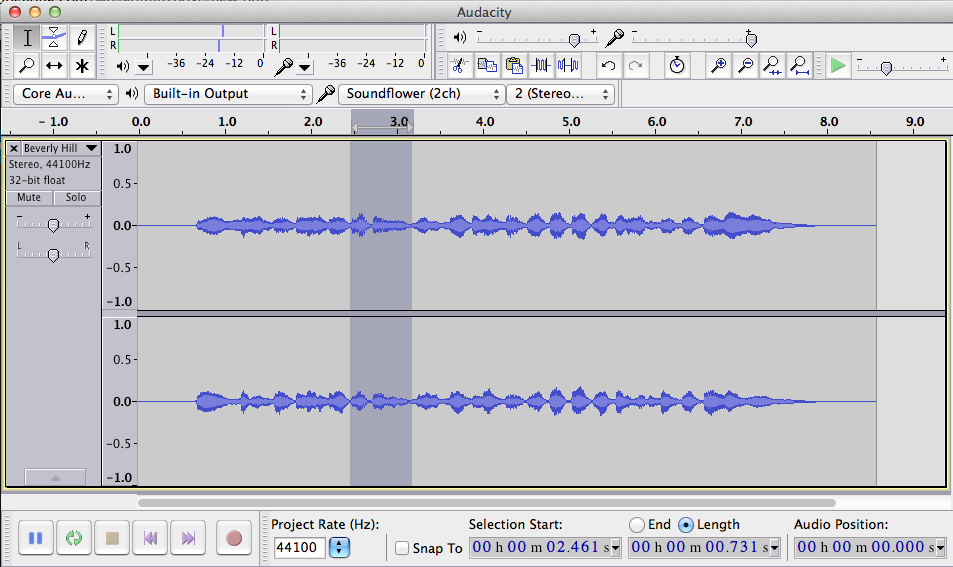
The first example uses to pen to scrub different locations of the tablet. Source material is the opening theme to Beverly Hills Cop.
The second example uses grid quantization for the Pen location. Dividing the sample start location and end location times by a beat factor (e.g. 32), we can quantize the length of the selection by a fraction of a beat. Match the playback of this fraction to the !BPM of a drumbeat, and voila! Instant gratification. Source material: Beverly Hills Cop theme + Bob James “Take Me To The Mardi Gras”
To sum up, using XY space to dynamically alter start/end selection times of a sample has strong performance possibilities. For those interested, I’ve shot a quick video of the controls inside Kyma and placed my source Kyma 7 files here.
Quick Kyma notes to no-one but myself:
a. use SampleWithTimeIndex.
b. for Beat quantization,
c. for On-the-beat triggers, use Capytalk
((1 bpm: !BPM) hasChangedReset: 0) trackAndHold: !PenDown
This means that the value starts at 0, PenDown will trigger 1 when next beat occurs.
Over the last few months, I’ve been interested in data zooming, where a finite range of data (say 0-1) can be magnified and explored in greater detail. We are all familiar with the paradigm. In Microsoft Word or Photoshop, for example, you zoom the view (e.g. 125%) and in the same amount of screen real estate, you see a smaller region (of words or pixels) in greater detail.

Zooming is also true for any stream of numbers. In software we can map a fader to move between 0-1 and on a similar fader (or the same fader), map the range to 0.0-0.1 (1/10 of its original range).

While a simple concept, data zooming can be a powerful tool. Magnification embodies focus, detail, and exploration. If sound is data or controlled by data, then magnification enables us to literally ‘zoom in’ on audio. Data zooming, then, becomes a way to explore sound space.
Inspired by Palle Dahlstedt [1], I set out to rapid prototype a way to zoom in on a data stream for live performance. I chose the Wacom tablet since I use this often in live performance with Kyma. I was most fascinated with !PenX (0-1 range), which I often map to the TimeIndex of a sound (0@start of sound, 1@end of sound). Regardless of audio sample length, PenX can be set so 0 will always be the beginning of the sample and 1 will always be the end of the sample. (note: TimeIndex range expects -1 to 1, but PenX range can be easily shifted to fit)
The basic gist of data zooming is that we need two controllers to do the job: a continuous fader (e.g. !PenX) and a button to trigger the zoom (e.g. !PenButton2). The pen/fader equates to the values that we read and in our case, the values that we map onto the TimeIndex of an audio sample.
Data zoom works like this: whenever the zoom button is depressed, we take the current location of the fader and “zoom” in to the location. With zoom enacted, the fader moves at a smaller scale around this location point. The magnitude of zoom can be altered, but for the purposes of this example, I worked with a 10x zoom magnitude. Before jumping into Capytalk and Kyma, let’s walk through my initial prototype inside Max/MSP. The math is the same.
The range of initial values (!PenX) are between 0-1. When the zoom button is depressed, we need to save the current location of !PenX and use as our new zoom location (offset). In addition, we need to alter the range in which !PenX moves through data (scale). I’ve uploaded the Max prototype patch and Kyma file here.
In order to take into account the centering of the Pen at the current zoom level, I had to add an additional offset that shifts the offset to the actual point of the pen on the tablet. The Max prototype includes multiple zoom levels at powers of 10.
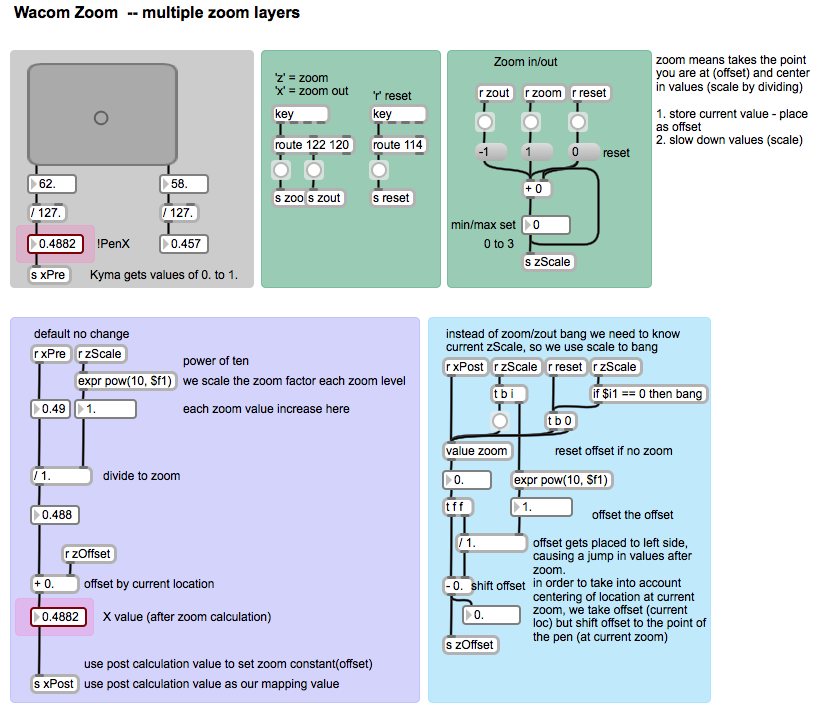
With Kyma, I used the same basic concept. When a button is pressed (!PenButton2), we zoom to the current value of X (sampleAndHold) and magnify the boundaries of !PenX from 0-1 to the zoom order (exponent of 10). Because 10^0 = 1, we can use a button’s press (binary 0 and 1) to create a simple on/off zoom in Kyma.

Here’s the Capytalk that achieves data zooming:
(!PenX / (10 ** !PenButton2)) + ((((!PenButton2) sampleAndHold: !PenX) – (((!PenButton2) sampleAndHold: !PenX) / (10 ** !PenButton2))) * !PenButton2)
First, !PenX is scaled down when !PenButton2 is depressed (power of 10). We then add back (offset) PenX’s location from when PenButton2 was pressed. In order to take account of the actual pen location on the tablet, we have to subtract PenX’s sampled location at the same order of the zoom. Lastly, we multiply this offset by !PenButton2 so that when the button becomes 0 (zoom off), the zoom offset no longer effects PenX’s initial, non-zoom state. Thus, with PenButton2 off, the Capytalk is just (!PenX / 1) + 0. Below is a short video sounding the process.
Download the Kyma and Max files.
[1] Palle Dahlstedt. “Dynamic Mapping Strategies for Expressive Synthesis Performance and Improvisation.” in Computer Music Modeling and Retrieval. Genesis of Meaning in Sound and Music. 5th International Symposium, CMMR 2008 Copenhagen, Denmark, May 19-23, 2008.
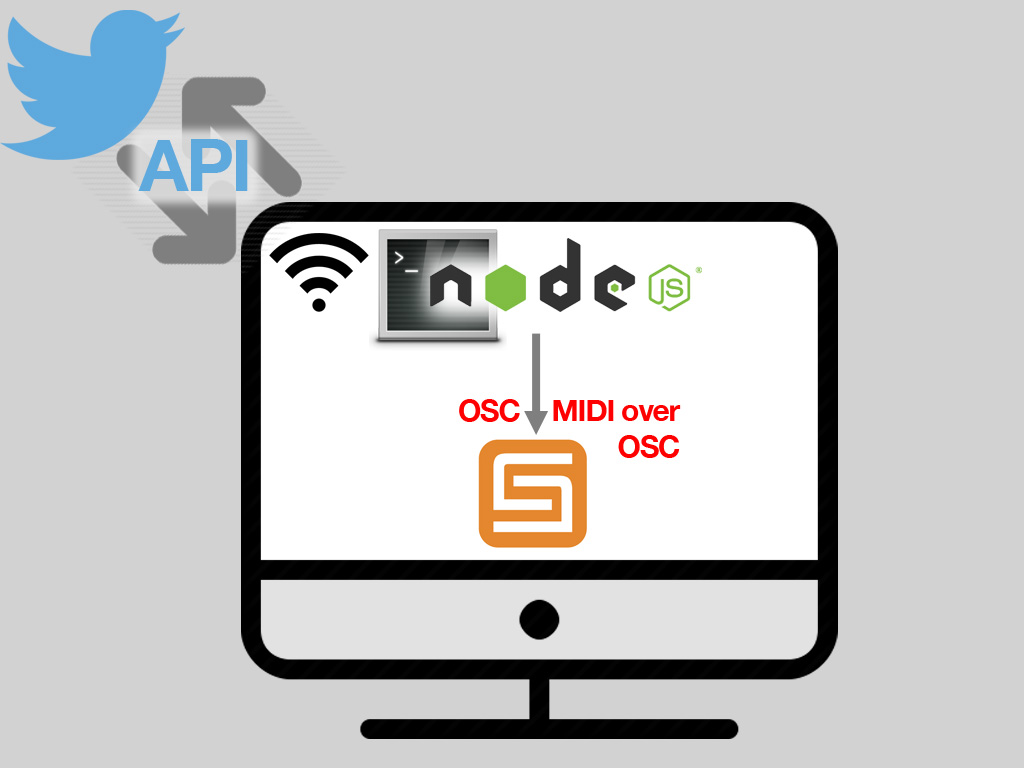
Built off of my work for #Carbonfeed (http://carbonfeed.org) and the KISS2015 conference (http://kiss2015.symbolicsound.com), Twitter-Kyma is open-source code for getting Twitter’s API working with Kyma 7.
Download src files and installation instructions: http://www.jpbellona.com/public/software/twitter-kyma.zip
This is a performance video of AUU (for eMersion wireless sensing) at the 2014 Margaret Guthman Musical Instrument Competition, held at Georgia Tech. I performed as a finalist representing Chet Udell’s eMersion wireless sensing system (unleashemotion.com/). The eMersion system is now commercially available. In this performance, the eMersion wireless sensors control both the sound synthesis (Kyma) and DMX stage lights in real time. No foot switches or third party help.
Thank you to Chet Udell for allowing me the opportunity to represent eMotion Technologies, playing some of my own music using the eMersion wireless sensing technology.